Wednesday, October 1, 2014

Gluten Free Challah Bread... a work of art!

I was born in 1957. If, like me, you are a child of the 20th century, Norman Rockwell's painting of Thanksgiving often comes to mind when you picture a holiday dinner. This painting, created in 1942 for a cover of the Saturday Evening Post, is one of four paintings, "The Four Freedoms," inspired by the State of the Union Address given by President Franklin D. Roosevelt. This scene depicts "Freedom from Want" and shows Rockwell's friends and family seated around a beautiful holiday table. Not only am I surprised, time after time, with Rockwell's uncanny ability to capture realism, I love how he breathes life into his subjects and invites us into the scene. I can almost smell the aroma of the freshly roasted turkey on the platter and I find the interaction between the diners so engaging. This is a boisterous family, talking over each other and enjoying a wonderful meal together. Just like my family. Just like yours?

In my house, a holiday like Thanksgiving will always be a celebration that gathers everyone around the table for a home-cooked meal. It can never be buffet style, it has to be a set table with real plates and your best silverware. It can never be prepared food from a deli, but food that was planned and labored over for days in advance, However "new age" my side dishes become... gluten-free, healthy veggies, and nontraditional ingredients.... it has to include the big turkey that you get up at the crack of dawn to roast. It is meant to be the star of the meal, simply because Norman Rockwell depicted it as so. I found over the years, though, that it does not have to be the best roasted bird ever (a little chicken broth will fix even the driest white meat!), but the mood, the company, the wine and the always amazing amount of dessert will make up for all that could go wrong. A holiday dinner is a work of art and a flavorful memory to treasure from year to year.

My latest feast was created for Rosh Hashanna. My scene did not look much like Norman Rockwell's scene except that I actually did have a Norman at the head of my table! Not everyone in the family was able to join us this year, but we reached out globally to more people than the seven of us could ever have imagined because photos of the meal were quickly uploaded to Instagram and Facebook... Is that our modern way to engage friends and family even if they can't be at the table with you? Would Norman Rockwell have added a cell phone if he painted the same scene today? I'm not sure I like that idea, but that is what art does best... it is ultimately a reflection of the times. In my reality, Norman Rockwell would not only have included a cell phone, but my gluten free challah bread too!


Gluten Free Challah Bread


Here is my recipe for a challah bread that even I could eat, and it is definitely a work of art! As Sam said at my dinner, "this cannot be gluten free!" Everyone preferred mine and not the round challah that we said the blessing over just for this occasion. With all the eggs and the honey, it is so moist and sweet. Delicious plain, even better as french toast!

1. In a large bowl that you first warm up by rinsing in hot tap water, combine:
    1 cup of warm water
    1 3/4 oz. packet of active dry yeast
    1 Tablespoon of sugar

2. Let this sit for about 5 minutes to proof. If the yeast does not start to bubble or foam up, the yeast is not active and you should start over with fresh yeast.

3. Meanwhile, whisk together in a small bowl:
    3 cups of gluten free flour (I like King Arthur brand)
    2 tsp. Xantham gum
    2 tsp. kosher salt

4. In microwave safe bowl melt:
      4 Tablespoons of butter

5. To the butter, whisk in:
     1/4 cup honey
     4 beaten eggs

6. Add the egg mixture to the yeast and then add in the dry ingredients, blending well until it creates a smooth batter.

7. Grease a loaf pan with butter or non stick spray. Spoon batter into loaf pan. Cover pan with plastic wrap and a kitchen towel. Let batter rise in a warm place (inside an oven that was not turned on is a good place) until doubled in size. This will take about 1 hour. Mine rose to the height of the pan but deflated slightly after the next step.


8. Run the tip of a knife along the top creating a braid-like design and gently dab the top with egg wash using a soft brush. (1 beaten egg and a splash of water)


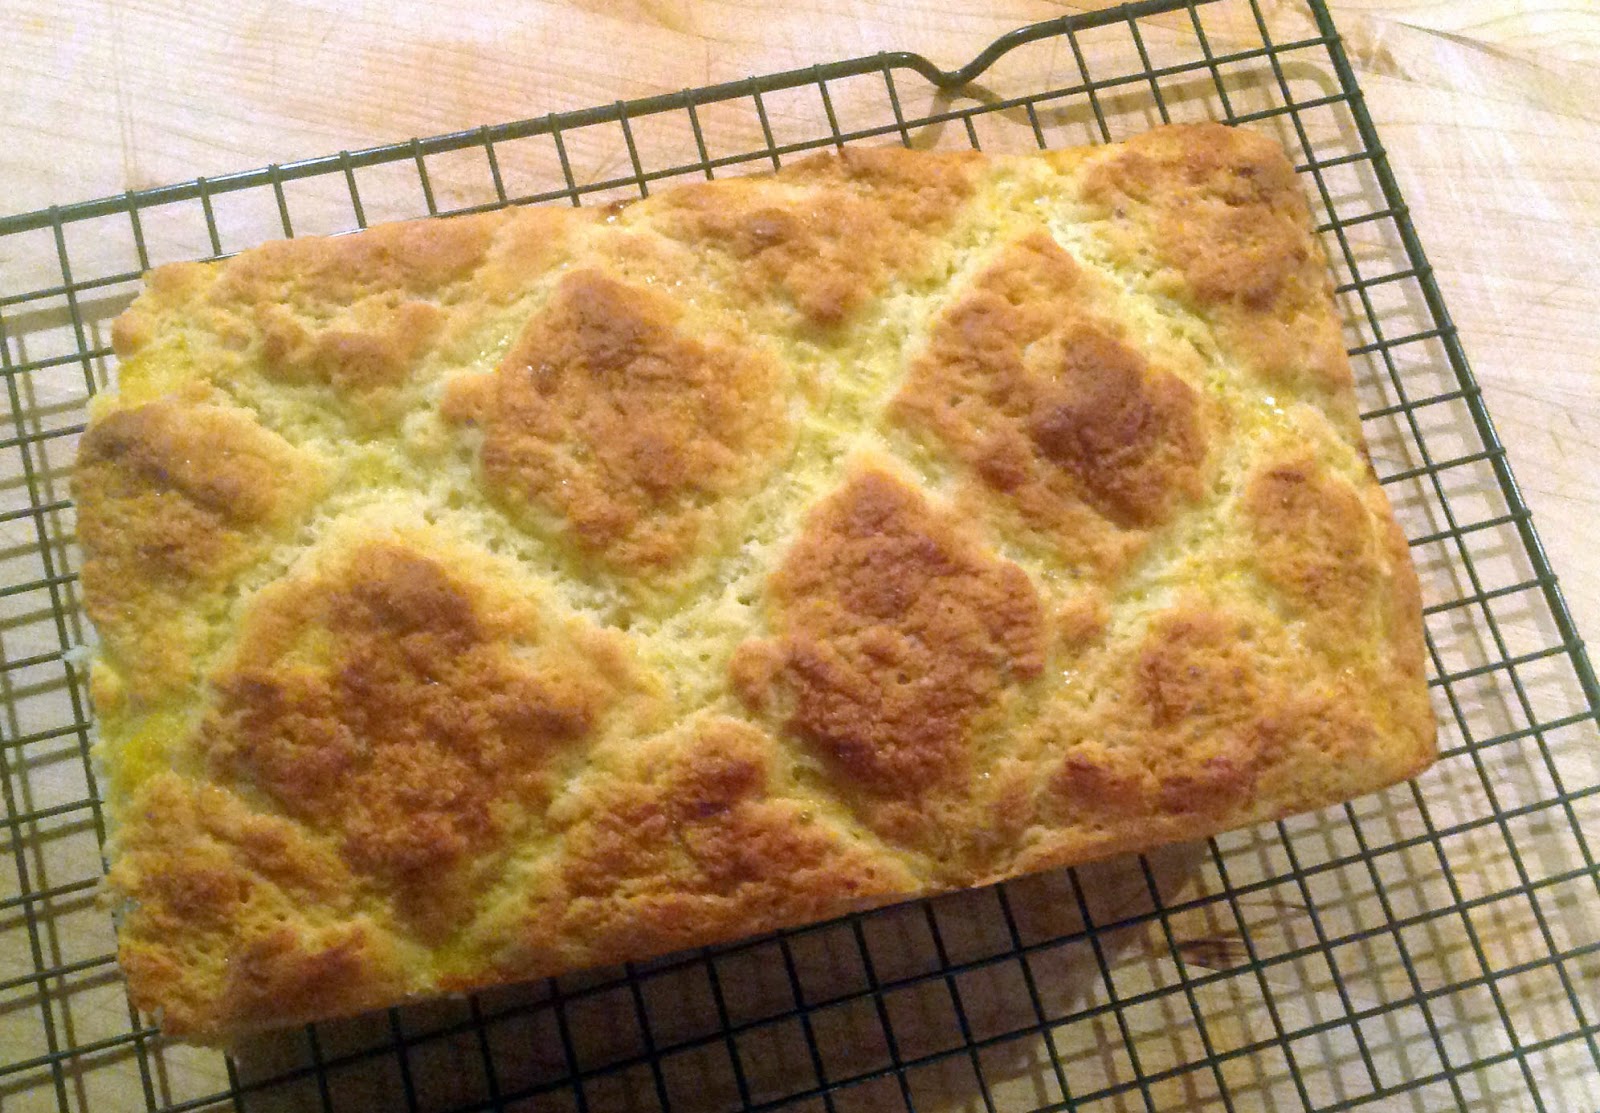
9. Bake in a preheated 375 degree oven until golden on top and toothpick inserted in center comes out clean. Let cool on a wire rack (if you can resist cutting into it immediately like I did!).


Monday, September 15, 2014

Ranney School Faculty Art Exhibit

I always have to remind myself to step back every now and then and look at what I have been creating from a different perspective. It might simply be that I have to walk away from a painting and look at it with fresh eyes the next day. Sometimes I take a photo of the canvas with my phone or iPad and see how it looks on a small screen as opposed to real life. Does something need to be a different color? Do my eyes focus on what I want everyone else to notice?

I have created many canvases over the last few years and what I remember most when I look back at my work is how much of a challenge each painting was to create. I have learned something from each one that I not only bring as a skill to my next painting, but it becomes something I can share with my students at school. My art classes have never been taught out of a text book, but out of my own experience as an artist. I am inspired by my students, and hopefully I inspire them. It is vital to me to be a working artist and so important for them.

So, why does my latest painting sit abandoned on my easel for the better part of this year? Every excuse in the book, from exciting new hobbies like quilting to a beautiful day to be outside, crops up and keeps me from completing this canvas. I have to get back into the painting mode again! What do other artists do when they lose interest? It is a good thing that I have not relied on my ability to finish a painting as a source of income!

I am positive that all creative effort has to be inspired and inspiration can come from the most random things. I can see an image on a billboard or a magazine that might send me to the art store to buy supplies for a new painting. Visiting a museum will always get my creative juices flowing again. But this time I did not have to look further than my own school and my own artwork. The art department at school is putting together a faculty art exhibit this week. Installing my work on the carpeted walls of Panther Hall Gallery was just what I needed at this point. I was seeing my work through the wide eyes of my students who could not believe I painted the adorable beagle or the larger-than-life tennis ball. I was given an opportunity to see my work from a different perspective. Just like stepping away from the canvas and taking a look with fresh eyes on a new day. This exhibit reminded me about my experience as an artist, my growth as an artist, and I could not wait to go home and pick up my paintbrush again.


Thursday, August 28, 2014

a day of inspiration: grounds for sculpture

Three days left to enjoy my summer vacation with my daughter Katie, and on this beautiful but hot day, we decided to visit Princeton for breakfast at our favorite pancake house (PJ's) and then make our way to Grounds for Sculpture in Hamilton, NJ. The sculpture garden is on the grounds of the former New Jersey State Fairgrounds and is the most amazing place to be inspired by both nature and art. I was introduced to Grounds for Sculpture years ago when I took a trip to the park with a few of the other art teachers at my school. Being introduced to these beautiful grounds by other artists while I discovered the intrinsic beauty and creativity of every inch of the park was quite an experience. It is with this same excitement and delight that I still visit this place. Of course, my daughter shares my crazy thrill for all things creative, so this visit was just as special as the first time.

The landscape filled with distinctive plants and trees changes with every season. Nestled into this natural setting are pieces of artwork, sculptures in wood, metal, glass and concrete. As you walk along a bamboo lined path, or meander into a hidden trail, the sculptures take you by surprise. They make you think, they often make you smile, and they always make you take yet another photograph as a reminder of the unique and beautiful vision you just happened to discover.


Seward Johnson, a present-day American sculptor, is the founder of Grounds for Sculpture, and there is a wonderful retrospective exhibit of his work at the park. Katie and I saw so many of his signature pieces in every corner of the place and half the time we were guessing if the people up ahead on the path were sculptures or actual visitors to the park! Johnson is best known for life size pieces of bronze-cast people, posed in typical everyday activities. While I am always fascinated by the creative process, I tended to gloss over the technique and skill with how he created his realistic and dimensional forms, and instead was drawn into a staged world envisioned by the artist, each time feeling a bit strange to be occupying the same space with his sculptures. If a couple of real people sitting on a bench in a park were engaged in a conversation, you may notice them from afar, or even come closer to ask them a question, but you certainly could not invade their private space, peer closely into their faces, or reach out to touch an arm or leg. At the Grounds for Sculpture, you are welcome to come close and touch even though it feels quite strange, as if you are defying an unspoken rule of social etiquette.


Seward Johnson was a painter before he became a sculptor and this is most evident with his "Beyond the Frame" series. With these pieces, he built elaborate sets based on the artwork of a well-known painting (often an impressionist work of art), and you are invited to walk through the space and become part of the painting. Not only are there natural highlights and shadows in the dimensional folds of the sculpted clothing, his subjects are painted to show dimension as an impressionist artist might have done with soft, visible brushstrokes. The effect of his surface brushstrokes is most amazing when you photograph the scene and the flattened image reverts back into a picture of a flat painting! I am an artist who enjoys working most with two dimensional forms and this exhibit challenged me to appreciate space and dimension in a new way. I was blown away with the irony of Johnson's vision and the recognition of the paintings that inspired his sculptures and sets. Today, I walked through van Gogh's room and caught a glimpse of dancers made famous on a Renoir canvas. What a thrill!


On exhibition this summer are also huge, 20 foot sculptures of popular icons created by Seward Johnson. Marilyn Monroe caught the eye and the camera lens of many visitors. But I love the incidental pieces, ones not displayed on a pedestal, but regular people just placed into the landscape as if they belong there, such as a man washing a window, another man painting a fence, a hot dog vendor, and a young art student sitting on the grass drawing a picture of a sculpture. What a great place to be inspired!


Thursday, August 21, 2014

My father, the artist

When you think back in your life to your earliest memories, it can be confusing what is a real memory or what you might have seen captured in a photograph and claim to remember. My mother kept a shoe box full of black and white early photos of our family in the closet, so there were certainly many of those moments saved for prosperity. But my first 'actual' memory and the one there is no photo of, just the image in my mind, is me standing in the basement of our house in Whitestone next to my dad's drafting table. I was not any taller than the table and I could barely see what he was drawing. To this day, when I think of an artist, I think of my father, his ideas, his projects, and his views on creativity in a very changing world. When I think of a proper art studio and the tools you would need to have to be an artist, I do not think of a computer screen and a stylus, I remember his drafting table, his brown metal lamp angled over the table, and his file cabinets filled with magazine clippings of pictures. Consider Pinterest, the best social media tool of all! That was his file cabinet, a place to keep everything and anything visual that he might want to refer to again at some point.

Although they claim differently, all the members of my family were talented, creative people. My grandmother, Baboo, was a seamstress. I still have her wooden singer sewing machine table with the treadle base that you pedal to make it go. I still have and treasure her handmade beaded evening purses that I am afraid to use because they are so fragile. My mother was a fantastic artist with a crochet hook, knitting needles, and embroidery thread. My dad would design projects for her that she would lovingly sew and then display in the house alongside his paintings. Talk about collaboration...a goal they try to teach us at school every year, as if it was a new concept! And my brother, Rick, who believes the creative gene completely bypassed him altogether was at one time a glass artist, and today, as a retired elementary school principal, he is a very creative chef and so passionate about anything that interests him...a sure sign of creativity waiting to happen at any turn.

But it is Daddy who we all think of as the artist. Robert Fisher grew up in Brooklyn, went to school for art when that was not quite the thing to do, and earned his degree in Industrial Design. I remember him working as a package designer when I was really young. At the end of the day, he would bring home a big poly bag of cheese because he was designing the container for Friendship cottage cheese. The little blue bird on the Friendship container that kind of looks like today's symbol for Twitter? That's my dad. For many years, he was also an art director at Ideal Toys, but it is not the brilliant toy package designs and illustrations that I remember, it is his score of creative hobbies at home that captured my interest.

We used to take long walks together in search of the perfect rocks. On these rocks, my dad would design an abstract painting and sit for hours with his ruling pen filled with acrylic paint and a magnifying lens strapped to his head, ruling perfect lines and arcs onto the surface of the rocks. These beautiful little specimens of art were displayed around the house along with his huge painted canvases with the same inspired designs. He always kept a sketchpad on him at all times and told me how important it was to draw every day.


Eventually, photography became his favorite medium. Taking his camera out on a Saturday morning in the city was only the first step in the creative process of photography for my father. He worked mostly with black and white film and in his self-constructed darkroom in the basement he became a scientist experimenting with chemicals and light to develop his own prints. His study of a manhole cover found on the streets of Manhattan became more of a beautiful abstract design than just a mounted photograph. His photo of an older man sitting outside a building in Soho who Daddy struck up a conversation with that day, turned into a dimensional image in a shadow box that pulls the viewer into the scene through its pure whimsy and unbelievably brilliant construction. His solitary black and white photograph of a chair on the beach became a lovely colorful image that he hand dyed with Dr. Martin dyes. The creative process in photography, to Daddy, was so much more than just taking the camera out for a walk.


"Boys of Summer"
one of his computer illustrations that reminds me
so much of his paintings and rock designs
These days, he no longer owns his beautiful drafting table or has access to a darkroom. About to celebrate his 88th birthday, my father is a true renaissance man. New developments in technology are simply new tools for him to explore and experiment with. Just last night our phone conversation was all about how he is playing around with the latest version of Adobe Illustrator 'on the cloud' and is learning how to do a particular style of computer illustration by watching YouTube tutorials. I was immediately inspired to try this out as a graphic art project with my students at school. To hear the thrill in his voice over doing something creative makes it hard for me to believe how many years he has inspired me and the next generation through my daughter, Katie, to appreciate art, to fill our lives with art, and to find our own creativity. I love you, Daddy.


me and my dad
katie and grandpa

Tuesday, August 19, 2014

Quilting, a new art form for me

For my birthday, Norman gave me a gift certificate good for a beginning quilting class at my local fabric store, Fabric Inspirations. I have always loved creating things out of fabric, yarn, or any kind of fiber, and although I learned how to sew as all of my generation did in an 8th grade home economics class, I never did try my hand at quilting. I adore handmade quilts, soft and cuddly ones with imperfect but lovingly sewn stitches. To me, each quilt should tell a story, perhaps through the chosen fabrics as in a memory quilt, or through the comraderie of the quilters who came together as a group to make it, or even in the history of the lucky owners who enjoyed its warmth. Quilts should be practical but beautiful, and definitely something to treasure.

Kate's pillow for me (front)
Kate's pillow for me (back)
My daughter, Katie, took a costume class in her fall semester at Rutgers and learned how to sew, quilt and embroider. She made for me a quilted pillow with lovely fabrics and an embroidered letter B for my name. She is so creative and thoughtful in every gift she gives to the people she loves and I was moved to tears with this handmade present. I went right out and bought a new sewing machine to replace my old one that stopped working years ago, as well as rulers, pins, a rotary cutter and a score of other tools to start my own quilt. I stared at videos on YouTube for hours, watching experienced quilters demonstrate their techniques and eventually had my favorite online quilters and a list of favorite blogs to follow. We attended a quilting exhibit and that was fun to see what people are doing with this art form today. Although I am still in love with the older style quilts, I saw art quilts at the show suspended on walls like paintings and they opened my eyes to the possibilities you can do with fabric. The designer in me was inspired for sure.

My iPhone case
My learn to quilt class would not start until later in the spring, but I was anxious to put my new hobby to the test. With my background in graphic design and mechanical art skills I jumped right into the craft, thinking I could do this! Starting small, my first project was a tiny quilted cover for my cell phone, and then a pillow for Katie as a thank you for starting me on this new journey. What fun!


My pillow for Kate (front)
My pillow for Kate (back)
Katie's pillow began with a design I created on Adobe illustrator based on Robert Indiana's Love sculpture. Even with my inexperienced quilting attempts, I was able to figure out how to add seam allowances to the shapes in the design and managed to stitch it together even though my scant quarter inch seams were not so perfectly uniform. The back of the pillow has a center block that Katie created in her class, embroidered with the words, "Thank you." The sewing on our beginner projects was certainly not perfect, but our pillows are an enthusiastic expression of love and creativity between a mother and daughter and that is perfection to me.


Monday, August 18, 2014

COOKING WITH GLUTEN FREE PASTA

We have a pasta dinner at least once a week in my family. Before my diet became gluten free, a favorite meal for us would either be a baked pasta like ziti or lasagna and we would have delicious leftovers for another day, or I would cook a pot of fresh pasta and pair that with a hearty meat sauce. Before the newer versions of GF pastas came out on the market, I could never just substitute brown rice pasta for regular semolina pasta and get away with calling it dinner at my table! It was awful in taste, gummy in texture, and could never stand up to leftovers. This meant making regular pasta for everyone else and boiling a separate pot of water for my portion of noodles. I was so happy to be able to eat anything remotely similar to pasta that I didn't complain much about the extra pots, strainers, and utensils to clean.


About a year ago, we were invited to our friends' apartment in Manhattan. Vicki's son, Ned, was in charge of making a dinner for us and he was sweet enough to make sure that even I could partake in the meal. He found a brand of GF pasta in one of the specialty shops in the city called "Bionaturae" Organic Gluten Free Pasta. What a difference it made! We could not tell that it wasn't "real" pasta. Reading the package, I saw that this pasta was a mixture of rice, corn and soy. A blend like this helps to create a better taste and texture. I was able to find this brand of pasta near my home at stores like Wegman's, Whole Foods and even Stop and Shop, and I now always keep packages of Bionaturae's penne, elbows, and fusilli in my pantry to grab for any night of the week. Thank you Ned!
  • The biggest lesson I learned from this experience is to never buy a single ingredient pasta. Corn pasta by itself is just as horrible as rice pasta. Always look for a mix of at least two different grains for the best taste and texture.
  • One of the most important tips I learned from watching my favorite chefs on television make their pasta dishes is something that becomes even more crucial with GF pasta. Rachel Ray, Mario Batali, and Lydia Bastianich all say it is important to cook your pasta a little shy of al dente and then let your pasta continue to "cook" in the pan with the sauce as you stir the entire dish together. This not only coats all of the pasta, but it imparts flavor into the actual noodle. By the time you are ready to serve a dish prepared this way, any kind of noodle would be delicious!
  • I have also learned to use the salted pasta cooking water as part of the sauce. It somehow acts a binder, helping the sauce stick to the noodles and it makes a healthier addition (it is just starchy water after all) than using oil, heavy cream, or butter to make more sauce. In order to have this water on hand when I finish up the sauce, I find it easier to scoop my cooked pasta out of the water with a big spider (or a slotted spoon) and transfer the pasta into the pan with the sauce instead of pouring the entire pot of water over a strainer in the sink. This way, you don't have to go to the trouble of remembering to save some of the water.

Sunday, August 17, 2014

YES, YOU CAN HAVE GLUTEN FREE PANCAKES!


The only way to wake up Sam on a Saturday morning is with the aroma of pancakes cooking on the griddle. My children grew up enjoying everyone's favorite "Aunt Jemima" buttermilk pancake mix. My only concession to using the store bought mix was to never succumb to the complete version that only calls for water. Mixing in my own eggs and milk seemed to make it more homemade somehow, especially when the artist in me created pancakes shaped liked their initials or a heart!

Going gluten free made my own love for pancakes a challenge. I started off trying a few GF pancake mixes on the market and cooking a small batch separately just for me. My attempt to create a tastier pancake led to a batter made completely from scratch, using the best blend of ingredients. Everyone now prefers mine for our pancake brunches on the weekends. 


Base Pancake Mix

This base recipe makes 5 bags of dry pancake mix to store in your pantry. Grab a bag any morning you'd like to whip up a batch for your family. To this mix simply add your fresh eggs and milk, and any delicious combination of tasty ingredients. Blueberry pancakes? Chocolate chip pancakes? It's easy!

1 1/2 cups rice flour
1 1/2 cups oat flour
1 cup potato starch
1 1/2 cups tapioca flour
1 Tablespoon fine salt
1 Tablespoon Xantham gum
1 1/2 Tablespoons baking powder
1/2 cup sugar (you can omit this and then a heaping tablespoon of agave or honey with the wet ingredients instead)


Mix all ingredients in a very large bowl. Blend well.
Divide mix evenly into 5 ziplock baggies. There should be about 1 1/4 cups of mix in each bag. Label the outside of the bags and store them in your pantry.


Blueberry Cheese Pancakes


Most recipes call for adding the eggs and milk to the dry ingredients but I found that it was hard to mix in the unbeaten eggs and just the right amount of milk without over mixing the batter (a big mistake for pancake batter). My recipe starts with the wet ingredients to avoid this problem. This recipe will make about ten 4" pancakes.

2 eggs
1 cup unsweetened almond milk
1/2 teaspoon pure vanilla extract
Grated zest of 1/2 lemon
1/4 cup ricotta cheese
1 bag pancake mix (1 1/4 cups)
Blueberries (fresh or unsweetened frozen)
Oil or butter for pan
  • In a large bowl, whisk together eggs, almond milk and vanilla. Add the lemon zest and ricotta cheese.
  • To the wet ingredients, add the bag of pancake mix. Stir until just combined. It should appear as a thick batter that will cling to your mixing spoon but easily drip back into the bowl. Gluten free flours tend to be a bit more absorbent than regular flours and may require more liquid. I found that 1 cup of almond milk works well, and that is quite different than the usual proportion of dry to wet with ordinary flour based pancakes.
  • Heat a griddle or large nonstick frying pan with grapeseed oil or butter. Use a ladle to add small rounds of batter to the hot pan.
  • Arrange blueberries on each pancake.

  • Cook over medium high heat until small bubbles appear. Flip pancakes over and cook until golden brown on both sides.
  • Serve with real maple syrup!


Pumpkin Pancakes

Follow same directions above, but skip the ricotta cheese, lemon zest and blueberries. Instead, blend in 1/4 cup pumpkin purée into wet ingredients. Add 1/8 teaspoon ground ginger and 1/2 teaspoon ground cinnamon to batter. These are delicious with fresh sliced fruit such as bananas and strawberries served on top.


Chocolate Chip Banana Pancakes

Follow same directions as blueberry pancakes, but skip the ricotta cheese, lemon zest and blueberries. Instead, blend in 1/2 large mashed banana and 1/2 teaspoon ground cinnamon to the batter. As I did for the blueberries, I never add the chocolate chips directly to the batter, but arrange them evenly on the pancakes while the first side is still cooking on the griddle.


Apple Nut Pancakes

Follow same directions as blueberry pancakes, but skip the ricotta cheese, lemon zest and blueberries. Instead, blend in 1 small grated apple (peel the apple and then simply grate it over the bowl using the large holes of a grater), 1/2 teaspoon ground cinnamon and 1/4 cup chopped walnuts to the batter. 


MANDEL BREAD


Mandel Bread is not a bread at all but a cookie. It is a Jewish version of an Italian Biscotti cookie. This recipe is based on my Aunt Elke's traditional Mandel Bread recipe that started off with a few simple ingredients. Of course, once I started revising it with gluten free options and healthier fats and sweeteners, it became a bit more involved.


The almond flour and coconut oil that I use to update this recipe definitely gives this simple, rustic cookie a deep and delicious taste!

Ingredients

1/2 cup almond meal
1 1/2 cup gluten free all purpose flour (King Arthur brand)
1 teaspoon baking powder
1/4 teaspoon salt
1/2 teaspoon cinnamon
1 teaspoon Xantham gum
1/2 cup coconut oil
3 large eggs
1 teaspoon pure vanilla extract
1/2 cup sweetener such as coconut palm sugar
1/2 cup chocolate chips
1/2 cup chopped nuts (such as walnuts, pistachios, or almonds)
Pinch of sugar and cinnamon for sprinkling over top

Preheat oven to 350 degrees. Line a cookie sheet with parchment paper. Do not grease.
  • In a small bowl, whisk together the almond meal, flour, baking powder, salt, cinnamon and Xantham gum. 
  • In a large mixing bowl, beat the coconut oil until creamy. Hint: Wash the bowl in hot water first and dry well before adding the coconut oil. The oil will cream easier if it is little warmer than room temperature. Add the eggs, sugar and vanilla, and blend well.
  • Blend the dry ingredients with the wet ingredients by adding it a little at a time. (I usually add the dry ingredients in thirds until well blended.) Use a rubber spatula to incorporate any of the batter on the sides of the bowl, especially the coconut oil that tends to stick there.
  • Fold in the chocolate chips and nuts.
  • Use your rubber spatula to transfer dough to parchment lined cookie sheet and form into long rectangular shape. Dough will be very wet and sticky. Sprinkle top with a pinch of sugar and cinnamon.
  • Bake in the center rack of your oven until it is golden along the edges and set in the center. Dough will spread even more as it heats up and bakes. 
  • Slip the cookie with the parchment paper off the cookie sheet and let it cool on your counter. (I rest it on my large wooden cutting board.) Let cool for about 15 minutes and while you are waiting, raise the temperature in the oven to 400 degrees.
  • Once the cookie is cool enough to handle, slip the parchment paper out from underneath and set the paper back on the empty cookie sheet.
  • Take a sharp knife and slice the cookie into long strips, like this...
  • Carefully set each cookie strip on its side back onto the parchment lined cookie sheet. It should all fit. You are simply toasting the side of the cookie, it will not spread anymore and you don't have to leave space between them.
  • Bake until toasted, about 5 minutes. This happens quickly so watch the oven carefully. Cool finished cookies on a wire rack. They harden as they cool.
  • I usually store them in the freezer just so I don't eat them every time I pass through the kitchen. (It is so wonderful to have a treat that I can eat again!) They freeze beautifully and happen to be delicious cold.

IT TAKES TWO TO MAKE CHEESE BLINTZES

These can really be made by one person, but it is so much more fun with someone else on hand to help. Katie usually helps by arranging the crepes on the kitchen towels. She also eats the extra bits of crepes that form on the outside of the circles, and helps me roll them around the cheese filling. With my daughter away at college, my husband came to the rescue. Here is Norman making perfect blintzes as he watches tennis on TV. Now that takes coordination!

The recipe below includes both regular and gluten free crepes. I always make them both ways for my family and the amount of batter for both versions together will yield just right amount of crepes for the filling. Note: For some reason, Farmer's Cheese does not cause a problem for me with my lactose intolerance, and it says right on the package of Friendship Farmer's Cheese that it has less than 0.5% of lactose in the cheese so that might be why. But if this would still be an issue, you can try other fillings such as fruit, or a savory version with mashed potatoes and other vegetables.

Ingredients

Filling:
3 lbs. Farmer's Cheese (You can buy a big log of this at the deli counter)
1/2 cup sugar or sugar substitute
2 eggs

Regular Crepes:
1 1/4 cups of water
1 cup of all purpose flour
6 eggs
Pinch of salt

Gluten Free Crepes:
3/4 cup of water
1/2 cup of Gluten free all purpose flour
1/4 tsp Xantham gum
3 eggs
Pinch of salt

Grapeseed oil or vegetable oil to fry the crepes
Butter to fry the finished crepes
Light sour cream
Frozen berries
Agave sweetener or honey


Cover a large counter space or your kitchen table with dish towels. I use two 10" non-stick omelet pans to create the crepes. If you do not have two 10" pans or you find it too difficult to juggle 2 pans at once, do one at a time.

  • In a large bowl, beat eggs and sugar together. Add the cheese and mix well. Set this bowl aside.
  • For the regular crepes, whisk flour and water together in a large bowl until smooth. Whisk in eggs and salt.
  • In a separate bowl, whisk GF flour, Xantham gum and water together until smooth. Add eggs and salt.
  • Heat the non-stick pans to medium high. I add a drop of oil to each pan. There should not be too much oil or the crepe will not set properly. Use a paper towel to spread the oil around evenly and to remove the excess oil, leaving just a fine coating in the pan. Do this after each crepe is done.
  • Pour a ladleful of crepe batter in the pan and quickly swirl it around to cover the bottom of the pan. Hold the pan over the batter bowl and let the excess drip back into the bowl. The crepe should be a very thin coating. Return the pan to the top of the stove and let it set for a few more seconds. You are simply waiting for any glistening wet spots to disappear as the crepe sets.
  • Cook only one side of the crepe. Do not try to flip it over and cook the other side. It is so thin that this is not necessary.
  • When the crepe is set, turn the pan over the kitchen towels on the counter and tap to release the crepe. 
  • Return the pan to the stove and add more oil with the paper towel, then repeat with the batter again. Make sure as you are arranging the crepes on the counter that you separate which ones are gluten free.
  • When all crepes are finished, add a small amount of cheese filling on top of each crepe. I usually arrange all the crepes on the counter and add cheese in the center of all of them before wrapping so that I know there is an even distribution of filling on each crepe. With your fingers, make the cheese look like a rectangular log in the center of the crepe. 
  • To wrap, fold 2 opposite sides of the crepe over the ends of the cheese log, then overlap the remaining two sides over the cheese to seal.
  • I hate to admit that butter does make a difference to the flavor of the blintzes so I do still cook them in a touch of butter on top of the stove. This step can be skipped. Using the pans I have out from making the crepes, I add a small pat of butter to each pan and place 4 blintzes in each pan to cook. Turn them once so that both sides are lightly golden brown.
  • Transfer each of the cooked blintzes into a large baking dish and keep warm in the oven. To make this ahead for serving later, cover the baking dish and refrigerate. Reheat them at 350 degrees until hot.
  • Serve with sour cream. A fruit topping can be made with frozen, unsweetened berries and agave sweetener or honey heated up in a small saucepan on top of the stove. Let the fruit bubble for a while until a thick sauce forms. Delicious!

BLUEBERRY CRISP


FILLING:
4 cups fresh or frozen, unsweetened blueberries (delicious with peaches too!)
3 Tablespoons cornstarch
Zest of one lemon
1/4 cup honey or coconut palm sugar
Pinch of Kosher salt

TOPPING:
1/4 cup almond flour
1/4 cup oat flour
1/4 cup rolled GF oats
3 Tablespoons coconut palm sugar or brown sugar
1 tsp. cinnamon
3 Tablespoons butter

  • Preheat oven to 375 degrees.
  • In an ungreased baking dish, mix together the frozen blueberries, the cornstarch, lemon zest, salt and honey.
  • In a small bowl, blend together the flour, the oats, the sugar and cinnamon. With your fingers blend the butter into the topping until evenly distributed.


  • Sprinkle the topping over the blueberries in the baking dish.
  • Bake for about 45 minutes or until hot, bubbly, and golden brown. Serve with your favorite whipped topping.