This is what Day 5 of retired life looks like. I am sitting in the den going through bags of stuff I brought home from Ranney. Some of the toiletries have been in my desk at school for 15 years. Do you think the Aleeve is still potent or the bandaids still stick? I am breezing through papers, cards and notes written by students, teachers and parents. Some of the letters make me smile, and almost all of them bring tears over memories that touch me deeply. I am anxious and uncertain of my future, leaving a job I was really proud of having. I had no business being a teacher without an education degree, but I think it was good to be an artist first. The kids got that and respected me for that, right from the start. They happily embarked on a long journey with me as we learned how to explore and create art together. What I could paint or draw, they learned how to paint or draw. My passion for children's book illustration, art history, technology in the arts, and applying paint on a blank canvas was never questioned.
Next to me on the computer desk, is a bear dressed up as an artist. This bear was made for me during my first year at school as a thank you for painting the scenery for the Lower School musical. I must have made an impression on the staff for the principal's secretary to create something so special. And after they saw the work I was doing with the kids, they asked maintenance to hang another bulletin board in the hallway, just so I had another place to display artwork. Everyone gave me the freedom to figure out how to teach and what to teach and they rewarded me with awards for teaching excellence. As I left Ranney School, I was proud to say I was an art teacher. I said goodbye to close friends in the faculty and the most adorable young artists who loved art class.
Six days ago, I lost my identity as an art teacher. It was my choice to stop and even as I know I was ready and it was the right decision for me, it still hurts. What will life look like now?
Monday, June 18, 2018
Saturday, January 16, 2016
Gloves for hand quilting
Living in the Northeast means dealing with dry hands every winter! Even more unforgiving is that my hands are in water all day, washing the brushes in my classroom, or just washing the winter germs off my fingers when my classes are over. Dry hands mean the top corners of my fingers crack and bleed. I try to put on lotion, honest I do, (just ask Norm how I feel about lotion!!) but even with coconut oil and tubes of lotion in every room, this is an awful fact of winter hands. As an artist, my hands have to work. With bandaids covering my cracked finger tips, they don't always work.
So lately I've been obsessed with gloves. Lotion and then gloves. Mittens work better to keep me warm and I have two pair that I drive to school with before the heat starts working in the car. Then there's the walking-the-dog gloves that grasp dog leashes and hold poopy bags. Of course, there's the fancy gloves from Coach that I got as a holiday gift and my cute red gloves, just because. Gloves are important. They protect my hands.
That brings me to quilting. I recently discovered the beauty of Perle cotton for hand stitching. I've been going back to my finished quilts and adding hand stitches to them. (When is a project ever really done?) The Perle cotton adds more contrast and I just love the look of the stitches on the fabric.
I sometimes have trouble pulling my needle with the heavier weight cotton through the fabric. And as I get better at stitching and can load up my needle with more than just one stitch, it is really hard for me to pull the needle and thread through.
As a good student of all things creative, I watched hours of videos on free motion quilting (before deciding that hand stitching was really my thing) and of course bought the gloves they told me to buy for this purpose. The gloves have rubber finger tips that grip the fabric as you move it around under the needle of the sewing machine.
So I grabbed my unused machine quilting gloves the other day and tried them with this hand quilting project. They worked brilliantly!! Not only did the rubbery tips of the gloves grasp the needle better for pulling the cotton through the fabric, but the tip of my middle finger had just enough thickness to act as thimble, pushing the needle through!
Now we just have to invent a pair of quilting gloves with lotion! Coconut oil gloves? Hmmm... Aloe vera gloves!
So lately I've been obsessed with gloves. Lotion and then gloves. Mittens work better to keep me warm and I have two pair that I drive to school with before the heat starts working in the car. Then there's the walking-the-dog gloves that grasp dog leashes and hold poopy bags. Of course, there's the fancy gloves from Coach that I got as a holiday gift and my cute red gloves, just because. Gloves are important. They protect my hands.
I sometimes have trouble pulling my needle with the heavier weight cotton through the fabric. And as I get better at stitching and can load up my needle with more than just one stitch, it is really hard for me to pull the needle and thread through.
As a good student of all things creative, I watched hours of videos on free motion quilting (before deciding that hand stitching was really my thing) and of course bought the gloves they told me to buy for this purpose. The gloves have rubber finger tips that grip the fabric as you move it around under the needle of the sewing machine.
So I grabbed my unused machine quilting gloves the other day and tried them with this hand quilting project. They worked brilliantly!! Not only did the rubbery tips of the gloves grasp the needle better for pulling the cotton through the fabric, but the tip of my middle finger had just enough thickness to act as thimble, pushing the needle through!
Now we just have to invent a pair of quilting gloves with lotion! Coconut oil gloves? Hmmm... Aloe vera gloves!
Wednesday, December 30, 2015
Drawing with thread in the city!
| Close up of "Starry Night" block center |
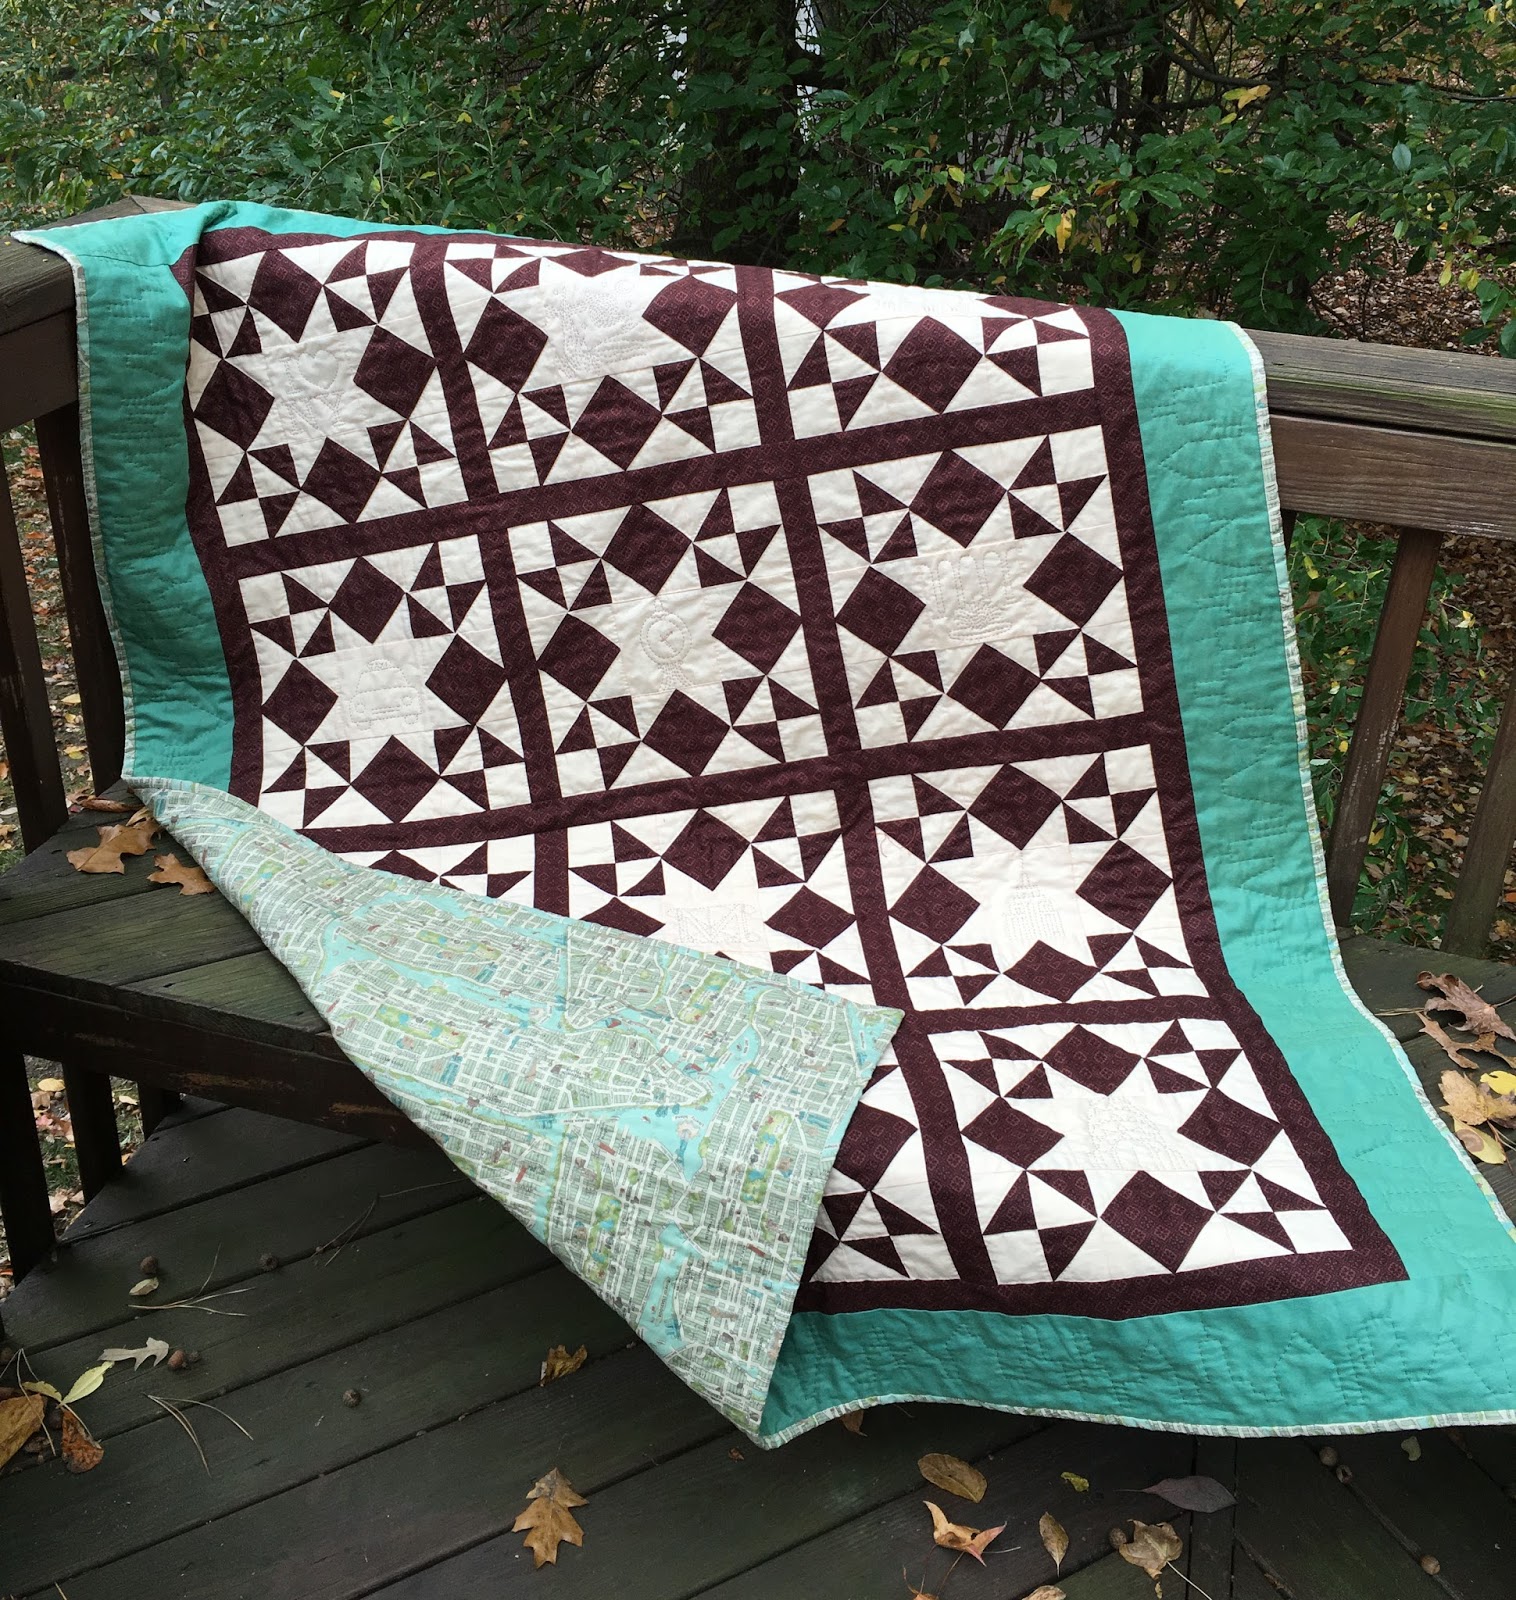
I completed 3 quilts and 1 quilted pillow over the last couple of years, learning very different techniques with each one. I thought I might as well continue to experiment with this art form on my kids. They are always happy to be on the receiving end of one of my creative whims... a new pancake recipe, a framed painting, a quilt... whatever!
So starting with my daughter, Katie did a bit of research on the computer and found a quilt block that she liked and then came to the quilt shop with me for fabric. As expected, she chose very conservative colors (brown and cream) with just a tiny print in the brown. It took what seemed like forever to cut out all the pieces for the quilt top and sew them together. With every quilt, I learn something new. With this quilt, I became more comfortable at my machine and actually sewed a pretty consistent 1/4" seam! I also figured out how to chain stitch all the small pieces to make it go faster.
Time for the border and backing meant another trip to the quilt shop. Katie zoomed in on a fabric that looked like a map of NYC. It was a wonderful choice and so unexpected for my conservative daughter! I know she is a fan of all things Manhattan, her grandfather and architecture at the top of that list, so I was thrilled that the quilt might now mean something more to her than just another experiment of mine. We also picked out a border fabric that would tie the colors of the backing fabric in with the front design.
Assembling the quilt with all the layers was exciting and I could not wait to get on with hand quilting the entire project. Now that we had a theme going with the NYC backing, I had ideas for the quilting designs. I would create a skyline all around the turquoise border and in each of the 12 centers of the blocks, I would stitch something that meant New York to Kate and to me. I could not remember being this excited about any other project in the longest time!
![]() |
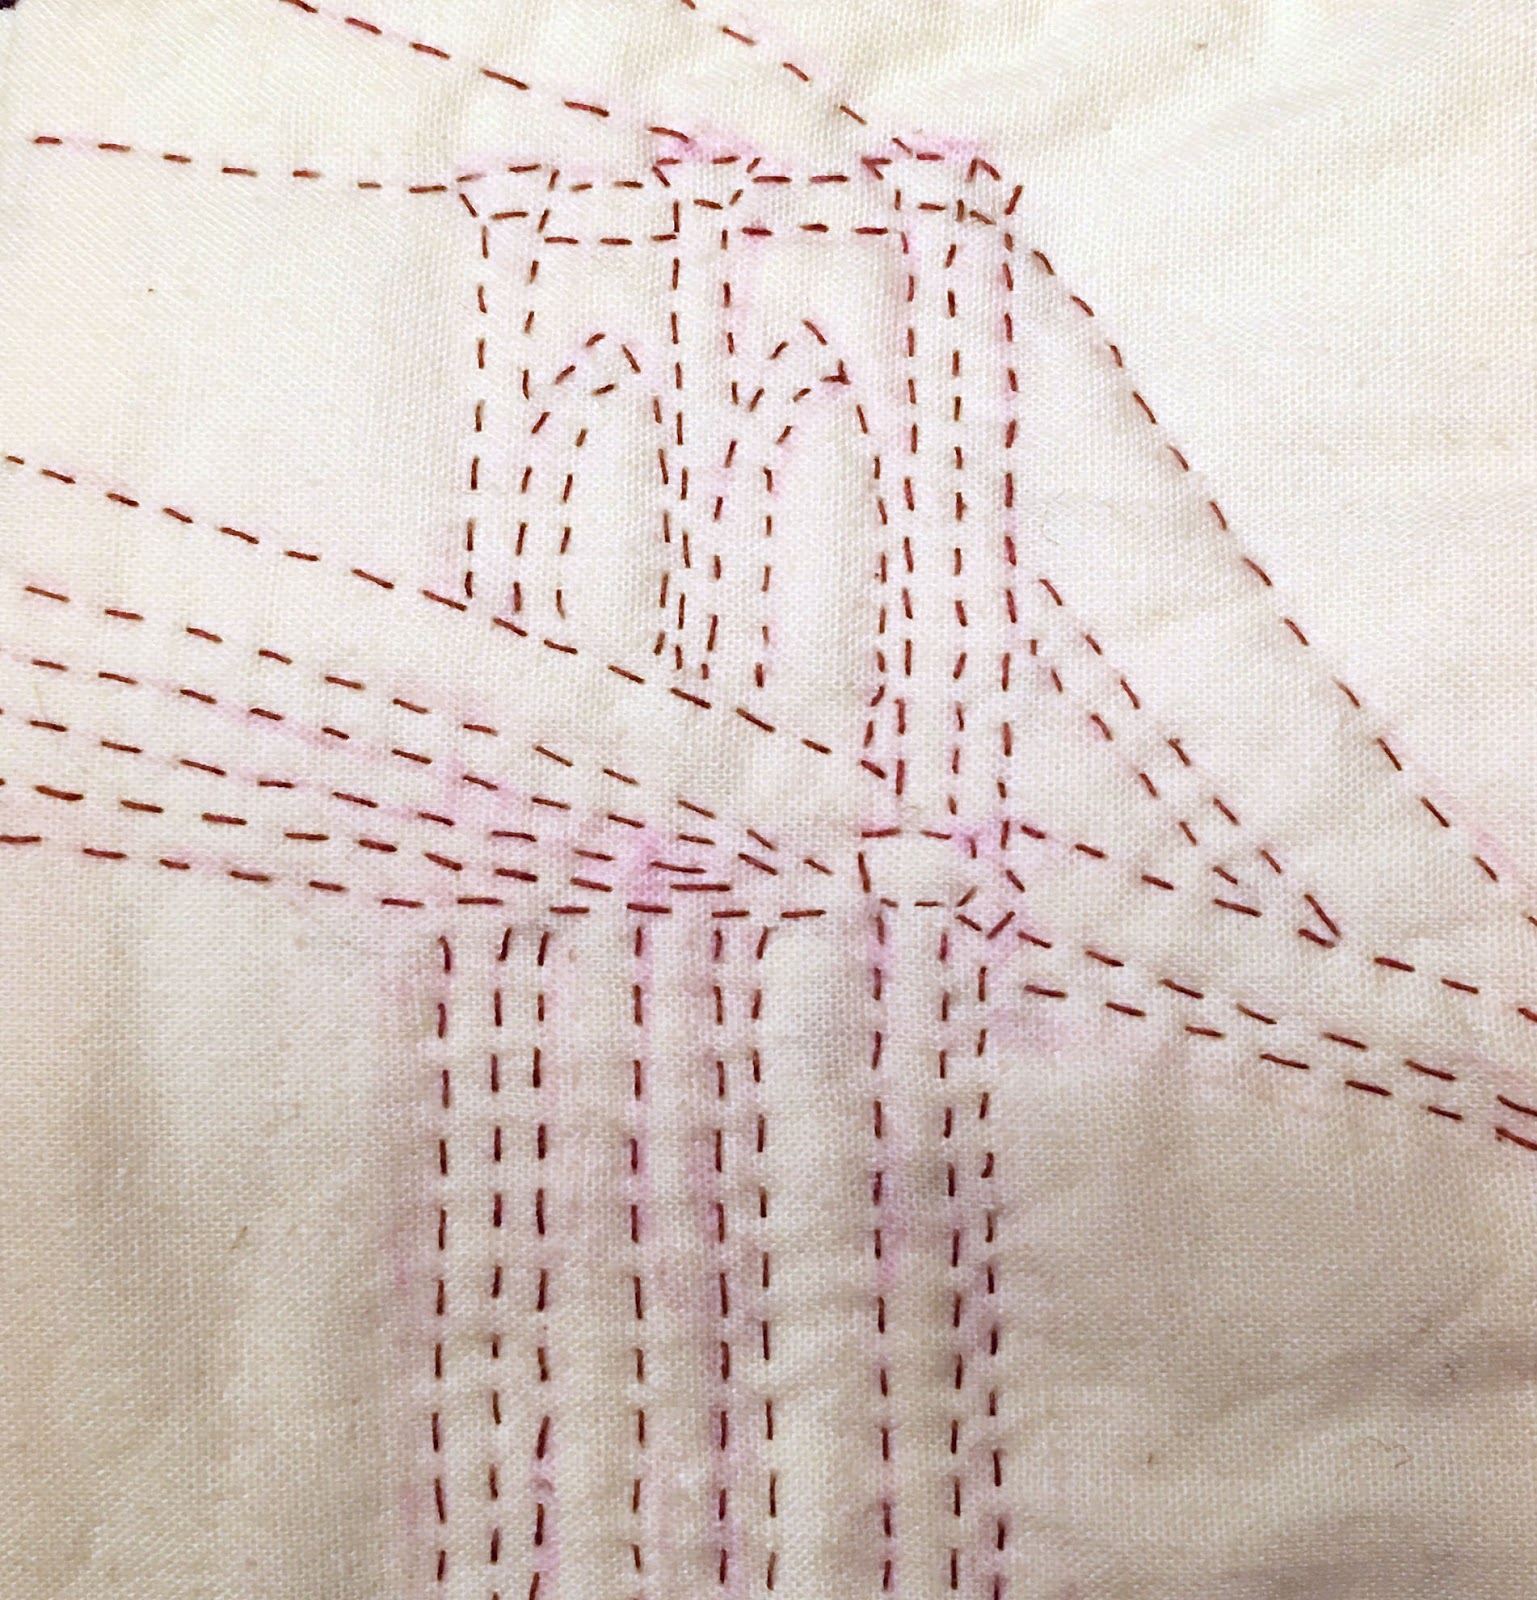
So with my vanishing purple pen in hand, I sketched different designs in each of the cream centers of the blocks and quilted the designs with brown thread. I was blending together my skills for drawing with my love for fabric. How perfect is that? I also used the brown thread for the skyline on the border and a cream thread to finish quilting around each of the triangles of the blocks. It was with a smile that I completed each section of this quilt and added my signature at the bottom. It is with a smile that I can share this with my daughter. After all she was the one who started me on this journey all along.
| Taxi Cab |
| Fountain in front of Lincoln Center |
| Empire State Building |
| NYC Public Library |
| I Love NY logo |
| Brooklyn Bridge |
| Metropolitan Museum of Art |
| The Big Apple! |
Tuesday, December 29, 2015
How do I sign my quilts?
I am an avid listener of Abby Glassenberg's podcast, "While She Naps." It is the conversation that accompanies me to school just about every day... especially when I was binge-listening to the last two years of her recordings! Now that I have caught up with all her back episodes, I eagerly await her new podcasts each week and try to entertain my trips with other podcasters, some of who are interesting and others who get jumped midstream to the next one on my iPod just like a song that I am not in the mood to listen to.
One wonderful and recent episode of "While She Naps" was an interview with Luke Haynes, a graphic artist turned quilter. He began as an art major in college and it is his graphic design and art skills that he brings to his quilts. This fact caught my interest quickly and after the episode, I found myself looking up his work and eagerly examining his quilted images online.
Although I love to quilt and I love to work with thread and fibers, my initial love for traditional quilts quickly faded away. I am not a perfect quilter and could never compete with the best-of-the-best quilters out there. I could never be judged for my sewing ability or how well I follow the rules of the quilting police. My creativity with quilting comes out of the joy of working with my hands, the joy of seeing how colors and patterns work together, and for the moment, my obsession with hand quilting the negative spaces. As I explore the many techniques for machine and hand sewing, I try to master these techniques as best as possible, then just enjoy what I can bring out of it as an art form. I am first and foremost an artist. It is what I do, it is who I am.
I pay homage to generations of women who have spent their lives stitching to perfection and may not have ever made a name for themselves in the process. But as a response to Abby's interview with Luke Haynes, there were many listeners who criticized him for getting his fame just by being a male in the mostly female world of quilts. And as one rebuttal put it, Mr. Haynes wants to be known for his quilts, not for being a male quilter, yet he signs his name so boldly on the front... a very male thing to do.
His bold name in all caps is what I first admired about his quilts! It never crossed my mind to label that a male thing. I enjoy the artwork of Robert Indiana, for example, and I use his "LOVE" sculpture as the basis of an art lesson that I teach in school each year. I have never considered Robert Indiana's work to be a male thing either, just an artist's interpretation of a design with letters.
As well, I never go on about Georgia O'Keeffe being a female because of her soft color palette. Her work becomes the focus in my classroom when we learn how to blend colors of paint on the canvas. And that is obviously not just a female thing to do! I suppose gender matters less these days and that is a good thing. We can all be inspired by anyone.
I have completed a couple of quilts since my "Learn to Quilt" class two years ago. For the first quilt I made, I was taught to make a label on the back of the quilt. That label became a work of art all by itself, with my choice of typeface for the name and date, and the beautiful fabric frame surrounding the muslin square with the signature. As soon as I heard the Luke Haynes interview, I realized what was wrong with my label. It should not be on the back!
After experimenting with hand stitching and recently adding designs to the border of this two year old quilt, I also added my signature using the same Perle 8 cotton I used for the border. It is signed exactly as I do my paintings. I am very proud of my efforts, and I love the feeling I get when I see my signature right there on the front.
![]() |
| Self-portrait quilt by Luke Haynes |
Although I love to quilt and I love to work with thread and fibers, my initial love for traditional quilts quickly faded away. I am not a perfect quilter and could never compete with the best-of-the-best quilters out there. I could never be judged for my sewing ability or how well I follow the rules of the quilting police. My creativity with quilting comes out of the joy of working with my hands, the joy of seeing how colors and patterns work together, and for the moment, my obsession with hand quilting the negative spaces. As I explore the many techniques for machine and hand sewing, I try to master these techniques as best as possible, then just enjoy what I can bring out of it as an art form. I am first and foremost an artist. It is what I do, it is who I am.
I pay homage to generations of women who have spent their lives stitching to perfection and may not have ever made a name for themselves in the process. But as a response to Abby's interview with Luke Haynes, there were many listeners who criticized him for getting his fame just by being a male in the mostly female world of quilts. And as one rebuttal put it, Mr. Haynes wants to be known for his quilts, not for being a male quilter, yet he signs his name so boldly on the front... a very male thing to do.
![]() |
| Robert Indiana |
As well, I never go on about Georgia O'Keeffe being a female because of her soft color palette. Her work becomes the focus in my classroom when we learn how to blend colors of paint on the canvas. And that is obviously not just a female thing to do! I suppose gender matters less these days and that is a good thing. We can all be inspired by anyone.
| My 2 year old quilt with a revised border design |
| For the border, I added rows of hand stitched Perle cotton. Then I improvised with free form swirls in red. |
| I love the detail that the quilting stitches adds to the wide border. |
| Not as bold as Luke Haynes, but there it is. |
Friday, December 25, 2015
Bringing art to life!
![]() |
| My grand-niece Emma with her Emma doll |
I wear many creative hats. I am a painter, an illustrator, a writer, a graphic designer, an art teacher, and a quilter. I am not doll maker in any way, shape or form. But that does not stop me from enjoying her interviews with doll designers and hearing their stories. On Pinterest, I saw a number of pins related to people making dolls out of kids' artwork. I was inspired to try this out after hearing the stories behind the many doll makers on Abby's show.
I teach art to 3 year olds through 5th grade at my school and something that is very common with my youngest students is how they draw people. Can you picture the well known M&M cartoon character with his arms and legs coming out of the head of the round candy? You might see this same characterization in any child's drawing. As young artists perceive people around them, the face is the most important element of anyone they meet, and everything (such as arms and legs) are simply extensions of the face. There might be a body between the head and the legs, but in their eyes, it is not as important to recognize or represent in their artwork.
We expect children to depict reality on paper, yet how can we get them to notice what is not important to them? If they get to design their own softies, they would need to make decisions that travel beyond where the eyes and mouth go on the face. For example, what color would they choose for the shirt or the dress? Beginner artists in my class drew a self-portrait making many color decisions for each part of their portrait. Then, using fabric samples donated to the art room, I turned each of these wonderful depictions into a softie and brought their drawings to life!
These dolls (11 in all) became the highlight of my art show this fall. And, because I am a tech nerd and always look for fun ways to integrate technology into my art room, I also used the Aurasma app on the school iPad, and took a video of each student holding their doll. When parents aim the iPad over each doll, the App triggers the screen to show the video of the student. Amazing!
After that exercise in creative fun, I went ahead and ordered one of Abby Glassenberg's PDF doll patterns. I don't know that I will ever become a doll maker... (as if I need yet another hobby!)... but once I created these adorable dolls for my class, I realized I should learn how to do it the right way, from Abby. I selected and ordered her Emma doll pattern for my grandniece Emma. I was so excited to start this doll and actually managed to finish it just in time for Hanukkah.
I think I will stick to what I do best... painting and quilting... of course until the next new project sparks my interest. I do hope, though, that my sweet Emma enjoys her handmade doll as much as I did my momentary obsession into the world of softie makers!
Wednesday, December 23, 2015
Making someone happy!
Norman is a tennis player. Even seeing out of just one eye, he is a tennis player. If he did not enjoy watching the game, playing the game, beating his opponent, or simply hitting the ball for the fun of hitting the ball, he would not be a tennis player. And as a true player, he collects all things tennis, like this multi-colored collection of tennis sneakers and the antique racquets that fill up our garage. In his retirement, a small thing like colorful sneakers makes him happy. Why not?
Being creative is what makes me happy. Happiness starts with a new idea, the prospect of turning an inspiration into my own creation. I've got a whole stash of happy thoughts just waiting to be painted, drawn, built or sewn at any time. It's amazing how I can remember anything at all with all those happy little dreams taking up residence in my head. There is pure joy in the development and decision making process. There is pure joy in setting up a composition on a canvas, selecting fabric, arranging my work area and starting a project.
Then there is the process. How could I not enjoy the process? I get into this weird zone with my work. It almost becomes a form of meditation with the strokes of my paintbrush flowing out of my hand without any effort at all. Music can be playing in the background, a podcast can be really interesting to listen to, but I hear nothing at all. It is really something to experience.... that zone of perfect creative harmony.
Completing a project can often be the most painful experience of all and the most thrilling at the same time. When is something done? I could re-work a section of a painting for months before I get it right. I am still re-working the border of a two year old quilt because I was not happy with the look and I knew a little hand stitching would be just the thing to make it perfect. I will put a project away and look at it on another day. I will take a picture of it on my iPad or phone just to see it in a different size or perspective. When something is right, I get it. And while no one else in my family will notice what I think is not finished, I will keep at it until the thrill of it being completed meets my artistic eye. I am my worst critic, but if I ever lower my standards, then why bother doing it to begin with? And it is always worth it. Always.
This is the season of giving. There is pure joy in gifting something I made to someone else. I almost always think that it comes down to making someone else happy. When something is done, the thrill is over and I am on to the next dream of another project. Only by making someone else happy can I keep that thrill alive. I love gifting my work. I love creating things with my hands. I love making people happy. It is my way to show them that I appreciate all that they do for me. It can be as simple as a handmade greeting card for Norman or a quilt that I worked on all year as a gift for Katie.
Sam recently dented the side of his ukelele and asked me to paint it. A couple of years ago, I painted a canvas for him with his fingers posed on the Steinway. It took me months to complete it. I was really proud of the result and thrilled for him to own one of my paintings. But I think he was just as excited to see his tiny painted ukelele and play me a song on the instrument once he re-strung it. Sam being his creative self on a Hawaiian painted uke...a gift that keeps on giving!
Below is a video of Sam playing on his painted uke. Happiness hits us all in such different ways. May we all find our "Happy" in the New Year!
Being creative is what makes me happy. Happiness starts with a new idea, the prospect of turning an inspiration into my own creation. I've got a whole stash of happy thoughts just waiting to be painted, drawn, built or sewn at any time. It's amazing how I can remember anything at all with all those happy little dreams taking up residence in my head. There is pure joy in the development and decision making process. There is pure joy in setting up a composition on a canvas, selecting fabric, arranging my work area and starting a project.
Then there is the process. How could I not enjoy the process? I get into this weird zone with my work. It almost becomes a form of meditation with the strokes of my paintbrush flowing out of my hand without any effort at all. Music can be playing in the background, a podcast can be really interesting to listen to, but I hear nothing at all. It is really something to experience.... that zone of perfect creative harmony.
Completing a project can often be the most painful experience of all and the most thrilling at the same time. When is something done? I could re-work a section of a painting for months before I get it right. I am still re-working the border of a two year old quilt because I was not happy with the look and I knew a little hand stitching would be just the thing to make it perfect. I will put a project away and look at it on another day. I will take a picture of it on my iPad or phone just to see it in a different size or perspective. When something is right, I get it. And while no one else in my family will notice what I think is not finished, I will keep at it until the thrill of it being completed meets my artistic eye. I am my worst critic, but if I ever lower my standards, then why bother doing it to begin with? And it is always worth it. Always.
This is the season of giving. There is pure joy in gifting something I made to someone else. I almost always think that it comes down to making someone else happy. When something is done, the thrill is over and I am on to the next dream of another project. Only by making someone else happy can I keep that thrill alive. I love gifting my work. I love creating things with my hands. I love making people happy. It is my way to show them that I appreciate all that they do for me. It can be as simple as a handmade greeting card for Norman or a quilt that I worked on all year as a gift for Katie.
![]() |
| "Play it again, Sam" Acrylic on canvas 24x30" |
| Sam's painted ukelele |
Tuesday, December 22, 2015
Returning to my roots
Falling in love with fabric, thread, and the quiet motion of hand stitching has become somewhat of an obsession for me, again. It is what I loved to do when I was young. There was something magical about touching the fibers and the process of creating something beautiful with them. My father built a huge frame in our basement for me to do my rug hooking, as he would do with anything that I might have showed an interest in. He was my biggest supporter in all things creative. And during the 60's and 70's, in the days of folk music and folk art, it was working with thread and yarn.
Then life got in the way. I majored in fine arts in college and transitioned to graphic arts immediately after graduation as a route to making money. With the birth of my children, I worked out of the house for many years using a very early Apple computer that Daddy bought me....way before anybody had a computer or even knew what email, Facebook, or the www. thing might be. I made a successful go with Adobe Illustrator, writing and illustrating instruction sheets for craft and science kits. I never minded working through the night when my children were asleep and I certainly did not mind working in my PJ'S! I also learned that I loved writing as much as I did drawing each detailed illustration. My least favorite thing to do was anything business related, especially submitting bills and figuring out estimated taxes. When the kids were older, I eventually moved into teaching and gladly accepted a regular paycheck every 2 weeks. I regret nothing that I did along the way, except perhaps having a better business sense when I worked for myself. These days, social media provides a much easier access to advertising who you are. But regardless, I know I would not be as good a teacher as I am without my 15 years of writing instruction sheets. I would not be as good an artist without growing up in a creative home, taking art in college when we all knew that it would not lead to a job, and having the confidence to be an artist whether you use a pencil, a paintbrush, a stylus, or a needle and thread.
Life does take funny twists and turns and we all seem to go around in circles. Katie recently bought herself a present on Etsy of embroidered flowers on fabric, stretched on a canvas frame. It looks just like the embroidery my mom used to do back in the early 70's. My dad would draw an outline of a scene on fabric and she would lovingly embroider it. Her work would proudly hang in the living room, right next to my dad's paintings and photographs, and my brother's stained glass. Yet, she never considered herself to be an artist. The embroidery that Katie bought looked so similar to my mom's and when I asked if it was a new piece, she told me that it was, in fact, made in the 1970's!
Well Mom, your work was just as beautiful, if not more so. If she only knew about Etsy, Pinterest, Instagram, or the Food Network!!! There's a lot of things that happened in the world during last 30 years that she missed, including the love of grandchildren and a great granddaughter. Oh, the creativity she could have shown us all.
Then life got in the way. I majored in fine arts in college and transitioned to graphic arts immediately after graduation as a route to making money. With the birth of my children, I worked out of the house for many years using a very early Apple computer that Daddy bought me....way before anybody had a computer or even knew what email, Facebook, or the www. thing might be. I made a successful go with Adobe Illustrator, writing and illustrating instruction sheets for craft and science kits. I never minded working through the night when my children were asleep and I certainly did not mind working in my PJ'S! I also learned that I loved writing as much as I did drawing each detailed illustration. My least favorite thing to do was anything business related, especially submitting bills and figuring out estimated taxes. When the kids were older, I eventually moved into teaching and gladly accepted a regular paycheck every 2 weeks. I regret nothing that I did along the way, except perhaps having a better business sense when I worked for myself. These days, social media provides a much easier access to advertising who you are. But regardless, I know I would not be as good a teacher as I am without my 15 years of writing instruction sheets. I would not be as good an artist without growing up in a creative home, taking art in college when we all knew that it would not lead to a job, and having the confidence to be an artist whether you use a pencil, a paintbrush, a stylus, or a needle and thread.
Well Mom, your work was just as beautiful, if not more so. If she only knew about Etsy, Pinterest, Instagram, or the Food Network!!! There's a lot of things that happened in the world during last 30 years that she missed, including the love of grandchildren and a great granddaughter. Oh, the creativity she could have shown us all.
Subscribe to:
Posts (Atom)